I began working on a problem generator using JavaScript and Desmos API for my Algebra 1 checks for understanding. I am hosting the files on http://mathseconds.com/. The following are links to the individual files (that I will, in the future, integrate into a new app):
Author: admin
MathSeconds Teachers Pay Teacher Store
MathSeconds is the name of my Teachers Pay Teachers store. Here is the link. The first item is a free, printable checklist of maths skills that my daughter will learn in kindergarten.

GitHub Page Update
I updated my GitHub page. Here is the link: https://mathwithjoy.github.io/
Geogebra, Google Sheets, and JavaScript
I found a demo of sending data from GeoGebra to Google Sheets. Here is the link: https://www.geogebra.org/m/uhsmpcpe.
I modified the demo and added several steps that were not explicit.
Google Sheet
Create a new Google Sheet. The cells in the first row will name the data collected from GeoGebra. For this demo enter the following in the cells of the first row:
- Timestamp
- Class
- x-coordinate
- y-coordinate
Click the “Tools” menu, then select “Script Editor.” Replace the existing code with the following:
//  1. Enter sheet name where data is to be written below
        var SHEET_NAME = "Sheet1";

//  2. Run > setup
//
//  3. Publish > Deploy as web app
//    - enter Project Version name and click 'Save New Version'
//    - set security level and enable service (most likely execute as 'me' and access 'anyone, even anonymously)
//
//  4. Copy the 'Current web app URL' and post this in your form/script action
//
//  5. Insert column names on your destination sheet matching the parameter names of the data you are passing in (exactly matching case)

var SCRIPT_PROP = PropertiesService.getScriptProperties(); // new property service

// If you don't want to expose either GET or POST methods you can comment out the appropriate function
function doGet(e){
  return handleResponse(e);
}

function doPost(e){
  return handleResponse(e);
}

function handleResponse(e) {
  Logger.log(e.parameter);
  // Google announced the LockService[1]
  // this prevents concurrent access overwritting data
  // [1] http://googleappsdeveloper.blogspot.co.uk/2011/10/concurrency-and-google-apps-script.html
  // we want a public lock, one that locks for all invocations
  var lock = LockService.getPublicLock();
  lock.waitLock(30000);  // wait 30 seconds before conceding defeat.

  try {
    // next set where we write the data - you could write to multiple/alternate destinations
    var doc = SpreadsheetApp.openById(SCRIPT_PROP.getProperty("key"));
    var sheet = doc.getSheetByName(SHEET_NAME);

    // we'll assume header is in row 1 but you can override with header_row in GET/POST data
    var headRow = e.parameter.header_row || 1;
    var headers = sheet.getRange(1, 1, 1, sheet.getLastColumn()).getValues()[0];
    var nextRow = sheet.getLastRow()+1; // get next row
    var row = [];
    var output = "";
    // loop through the header columns
    for (i in headers){
      if (headers[i] == "Timestamp"){ // special case if you include a 'Timestamp' column
        row.push(new Date());
      } else { // else use header name to get data
        row.push(e.parameter[headers[i]]);
      }
    }
    // more efficient to set values as [][] array than individually
    sheet.getRange(nextRow, 1, 1, row.length).setValues([row]);
    output = JSON.stringify({"result":"success", "row": nextRow});
    if (e.parameter.callback){
      // return jsonp success results
      return ContentService
          .createTextOutput(e.parameter.callback+"("+ output + ");")
          .setMimeType(ContentService.MimeType.JAVASCRIPT);
    }
    else{
      // return jsonp success results
      return ContentService
          .createTextOutput(output)
          .setMimeType(ContentService.MimeType.JSON);
    }
  } catch(e){
    output = JSON.stringify({"result":"error", "error": e});
    if (e.parameter.callback){
      // if error return this, again, in jsonp
      return ContentService
          .createTextOutput(e.parameter.callback+"("+ output + ");")
          .setMimeType(ContentService.MimeType.JAVASCRIPT);
    }
    else{
      return ContentService
          .createTextOutput(output)
          .setMimeType(ContentService.MimeType.JSON);
    }
  } finally { //release lock
    lock.releaseLock();
  }
}

function setup() {
    var doc = SpreadsheetApp.getActiveSpreadsheet();
    SCRIPT_PROP.setProperty("key", doc.getId());
}
Save the Google Script. Back in Google Sheets, click on the “Tools” menu, select “Macros,” then “Import.” Add all listed functions. Click on the “Tools” menu again, select “Macros”, then run the “setup” function by clicking on it.
Click on “Continue” on the “Authorization Required” pop-up box. Continue until you see the option to “allow” the script to “See, edit, create, and delete your spreadsheets in Google Drive.” Click on the “Allow” button.
Back in Google Script, click on the “Publish” menu, then select “Deploy as web app…”. Set the deployment options, then click on the “Deploy” button. Copy (to the clipboard) the macro link that you’ll need in your GeoGebra app.
GeoGebra
Start calculator. Assign x- and y-coordinates of a point “A” to variables “ax” and “ay” in the calculator table. Create a text (e.g., “Statistics”) and link to it when you create your “Class Name” input box.
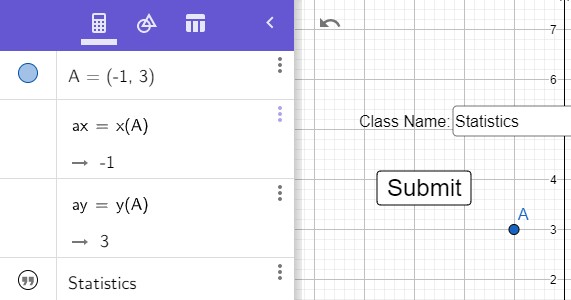
View the settings for the “Submit” button by right-clicking on the button. Click on the “Script” tab. In the “On Click” box, copy and paste the following JavaScript:
var class0 = ggbApplet.getValueString("text1");
// cannot name a variable as 'class'
var ax = ggbApplet.getValue("ax");
var ay = ggbApplet.getValue("ay");

if (confirm("Confirm to submit?\nClass: " + class0 + ", point A = ("+ax+", "+ay+")" )) {
    sendData(class0, ax, ay);
}
In the “Global JavaScript” box, copy and paste the following JavaScript, but replace the assigned value of variable scriptURL with the URL you copied earlier:
function get(url) {
    var xhttp = new XMLHttpRequest();

    xhttp.onreadystatechange = function() {
        if (this.readyState == 4 && this.status == 200) {
            var response = xhttp.responseText;

            if (response) {
                response = JSON.parse(response);
                if (response.result == "success") {
                    console.log("added to row " + response.row);
                    alert("Successfully submitted");
                } else {
                    alert("Error: " + response.result);
                }

            }
        }
    };

    xhttp.open("GET", url, true);
    xhttp.send();

}

function sendData(class0, x, y) {
    var scriptURL = "https://script.google.com/macros/s/AKfycbw0iQbrj2KFJn67y_L0LHm_dct7HykgI-BqpHyFqgRYy5jcdYUd/exec";
    var app_name = "demo";
    if (class0 !== "") {

        // eg https://script.google.com/macros/s/AKfycbw0iQbrj2KFJn67y_L0LHm_dct7HykgI-BqpHyFqgRYy5jcdYUd/exec?Name=test&Class=1A&x-coordinate=1&y-coordinate=2

        // the name "Class", "x-coordinate", "y-coordinate" must match the header row in the spreadsheet
        var url = scriptURL + "?Name=test";
        url += "&Class=" + class0;
        url += "&x-coordinate=" + x;
        url += "&y-coordinate=" + y;

        get(url);

    } else {
        alert("Please input the class and class number");
    }
}Time with Joy fitbit Clockface
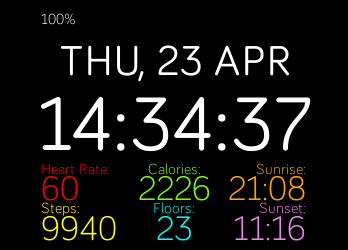
I developed and published a fitbit clockface called “Time with Joy.”
The clock displays the following: battery life, day of the week, date, time with seconds, heart rate, number of steps, calories burned, elevation (floors), sunrise time, and sunrise time.
It is available at this link: https://gallery.fitbit.com/details/dd3ee287-2024-455b-80a2-c096b06188cd.
HSSH Update – It’s Back!
The High School Stats Helper is back on the Google Play Store!
MathQuill
MathQuill is a formula editor for web applications. I started using MathQuill in my math-problem generator to dynamically generate math problems . In order to use MathQuill, add the following between the <head> tags of your HTML:
<link rel="stylesheet" href="css/mathquill.css"/>
<script src="js/jquery-3.2.1.min.js"></script>
<script src="js/mathquill.js"></script>
At the end of the <html> document, add the following:
<script>
    var MQ = MathQuill.getInterface(2); // for backward compatibility
</script>
Now you can use the following Javascript code to dynamically generate math statements for <span id=”id”></span> with the corresponding ID:
function name() {
    var span1 = document.getElementById("id");
    span1.innerHTML = "";
    MQ.StaticMath(span1);
}HSSH Update
I updated the High School Stats Helper app for Android and uploaded it to the Google Play Store for review. The ETA is 4/19/2020. I will be updating this app more consistently until it is finished.
I have a work-in-progress version of the app available at statsassistant.com.
Activities for Statistics
I wrote a book titled “Activities for the High School Statistics Classroom” and submitted it on Kindle Direct Publishing. It is currently in review. If approved, it will be available for purchase on Amazon (for Kindle and on paperback) for $9.99.

cODeLHÁ Programming Club

I am so excited about the new programming club at ODLHÁ.
First, I’m going to have the club create static pages on GitHub using HTML and CSS. Then I’m going to have the club create web applications using JavaScript. After that, I plan on introducing Python and SQL.